selmertsxの素振り日記

ひたすら日々の素振り内容を書き続けるだけの日記

TypeScriptで書いたCloud FunctionsをCloudBuildを使ってDeployする

これを読んで出来るようになること

TypeScriptで書いたCloud Functionを、Code Buildを使ってdeployできるようになる。

前提と事前準備

前提

  • CloudFunctionsのコードはwebpackを使ってまとめている
  • Deployは serverless コマンドではなく、gcloudコマンドで行っている

事前準備

過去の記事

selmertsx.hatenablog.com

設定

ディレクトリ構造

cloud_source_repository_test git:(master) tree -I node_modules
├── README.md
├── cloudbuild.yaml
├── package-lock.json
├── package.json
├── src
│   └── index.ts
├── tsconfig.json
└── webpack.config.js

TypeScriptのサンプルコード

import { Decimal } from "decimal.js";

function subscribe(req: any, res: any){
  const x = new Decimal('0xff.f')
  return res.send(`Hello World! ${x}`);
}

export { subscribe }

cloudbuild.yamlの設定

steps:
  - name: node:8
    entrypoint: npm
    args:
    - install

  - name: node:8
    entrypoint: npm
    args:
    - run
    - build

  - name: 'gcr.io/cloud-builders/gcloud'
    args:
    - functions
    - deploy
    - subscribe
    - --stage-bucket=xxx
    - --trigger-http

buildコマンドの中では webpack --mode productionが実行されています。

tsconfig.jsonの設定

{
  "compilerOptions": {
    "target": "es2017",
    "module": "commonjs",
    "strict": true,
    "preserveConstEnums": true,
    "strictNullChecks": true,
    "sourceMap": true,
    "outDir": "./",
    "moduleResolution": "node",
    "esModuleInterop": true
  },
  "include": [
    "src/**/*.ts"
  ],
  "exclude": [
    "node_modules"
  ]
}

Webpackの設定

module.exports = {
  entry: "./src/index.ts",
  target: 'node',
  output: {
    path: __dirname,
    filename: 'index.js',
    libraryTarget: 'this'
  },
  module: {
    rules: [
      {
        test: /\.tsx?$/,
        use: 'ts-loader'
      }
    ]
  },
  resolve: {
    extensions: [ '.js', '.json' ]
  }
}

IAM Roleの設定

f:id:selmertsx:20181009192122p:plain

動作確認

$ curl https://xxx.cloudfunctions.net/subscribe
Hello World! 255.9375%

備考

webpackを利用する理由

  • node_modulesも、Cloud Functionにuploadすればwebpackを利用する必要は無い
  • CodeBuild内でBuildとdeployをするため、Development環境用のpackageもinstallは必須
  • Development環境用のpackageもgcloud コマンドでdeployするとファイルサイズが大きくなる

残タスク

GCPのCloud BuildでCloudFunctionsをデプロイする

モチベーション

GitHub上で管理しているCloud Functionsのコードについて、masterにマージされたタイミングでdeployして欲しい。

Cloud Buildとは何か?

Docker Image作ったり Cloud Functionsをdeployしたり、テストしたりできます。CircleCIみたいなものをイメージして頂けるとよいかなと思います。各タスクに必要なDocker Imageについて、GCPが提供している公式のイメージが使え、GCP内のリソースにもアクセスできるので、GCP固有の機能を使う際にはCloud Buildを用いるのが便利なのではないでしょうか。GCPを利用しているサービスでCloud Buildを利用すると、Credentialsな情報をGCP内のみで扱うことができるというメリットもあります。

今回やることの一覧

  • Cloud Source Repositoriesを作成
  • Cloud Source RepositoriesとGitHubを連携
  • Cloud Buildの Triggerを設定
  • Cloud Buildの build config fileを設定

事前準備

今回デプロイしたいコードを用意したGitHubリポジトリを作成しておきます。今回はサンプルとして下記のリポジトリを用意しました。

https://github.com/selmertsx/cloud_source_repository_test

Cloud Source Repositoriesの設定

Cloud Source Repositoriesに関して設定しなければならない項目は下記2点です。全部で10分程度で終わります。

  • Cloud Source Repositoriesを作成
  • Cloud Source RepositoriesとGitHubを連携

この設定ですが、基本的に公式で提供されているこの手順通りにやれば大丈夫です。すると、このように連携可能なGitHubリポジトリの一覧が出てくるので、ここから目的のものを選びましょう。今回はcloud_source_repository_testを選択します。

f:id:selmertsx:20181005170848p:plain

Cloud Build Triggerの設定

  • Cloud Buildのトリガー設定ページにアクセス
  • Add Triggerを選択
  • Cloud Source Repositories のリポジトリを選択
  • 先程設定したCloud Source Repositoriesを選択
  • Triggerの設定をする
    • 今回はmaster branchの変更時にcloud buildを実行したいので、下記のように設定した

f:id:selmertsx:20181005170953p:plain

cloud functionsの実装

最初にコードをuploadする際のbucketを用意します。

$ gsutil mb gs://selmertsx-sample-bucket
Creating gs://selmertsx-sample-bucket/...
exports.subscribe = (event, callback) => {
  return callback(null, "Success");
}

今回はシンプルにこれだけです!

build config fileの設定

build config fileの設定については、下記資料を参考にして行いました。

steps:
  - name: 'gcr.io/cloud-builders/gcloud'
    args:
    - beta
    - functions
    - deploy
    - subscribe
    - --stage-bucket=selmertsx-sample-bucket
    - --trigger-topic=cloud-builds

上記ファイルをloud_source_repository_testのルートディレクトリに置いて、master branchにpushします。すると下記のようにcloud buildが実行されます。

f:id:selmertsx:20181005170801p:plain

今回のjavascriptコードはcloud buildの実行をtriggerにしているので、deployされたコードはそのまま実行されちゃいます。その結果がこちらです。

f:id:selmertsx:20181005170712p:plain

というわけで、Cloud BuildからCloud Functionsがデプロイできるところまで確認できました。

CloudFunctionsをServerless Framework & TypeScriptの環境で試してみる

やったこと

Serverless Frameworkを使って CloudFunctionを動かしてみました。 試した内容は下記の通りです。

  • TypeScriptで書けるようにしてみる
  • serverless.ymlの設定で環境変数を利用する
  • 日本のリージョンにDeployする

実際に利用したコード https://github.com/selmertsx/study/tree/master/serverless/cloudfunction-sls-sample

前提

https://serverless.com/framework/docs/providers/google/guide/quick-start/

上記チュートリアルを実行して、nodejsのコードをdeploy & invokeできるようにしてある前提で話を進めます。

TypeScriptで書けるようにする

https://github.com/prisma/serverless-plugin-typescript このpluginを利用します。

手順は簡単で、下記の手順を踏むだけで設定可能です

  • serverless.yml のpluginsに serverless-plugin-typescript を追加する
  • 指定されたフォーマットでtsconfig.jsonの設定をする
  • 既存のコードをTypeScriptに置き換える
  • (options) package.jsonのmain fieldを書き換える
plugins:
  - serverless-google-cloudfunctions
  - serverless-plugin-typescript
// Note: outDir と rootDir optionsを上書きしないこと
{
  "compilerOptions": {
    "target": "es5",
    "outDir": ".build", 
    "moduleResolution": "node",
    "lib": ["es2015"],
    "rootDir": "./"
  }
}

もし起点となるコードが index.ts でなければ、package.jsonのmain fieldを下記のように書き換える必要があります。

// handler.tsを起点にしたい場合
{
  // ...
  "main": "handler.js",
  // ..
}

serverless.ymlの設定で環境変数を利用する

https://serverless.com/framework/docs/providers/google/guide/variables/

公式ドキュメントを見ると、ymlやjsとして別のファイルに切り出したり、serverless.dev.ymlのように環境毎にymlを分けたりする方法が書かれています。今回はgitにcommitしたくないコードの管理がしたかったので、ちょっとその用途とは違うため別の方法を模索しました。

https://serverless.com/framework/docs/providers/aws/guide/variables/

awsの方のGuideを見てみると、下記のような機能がありました。

o reference environment variables, use the ${env:SOME_VAR} syntax in your serverless.yml configuration file. It is valid to use the empty string in place of SOME_VAR. This looks like "${env:}" and the result of declaring this in your serverless.yml is to embed the complete process.env object (i.e. all the variables defined in your environment).

これについてgoogleでも使えないかと試してみたところ、普通に使えたので今回はそれを利用しました。

service: cloudfunction-sls-sample
provider:
  name: google
  project: ${env:PROJECT}

日本のリージョンにDeployする

cloud functionsでServerless Frameworkを利用し、regionを何も指定せずにdeployをすると us-central1にdeployがされます。 deploy先のregionをserverless.ymlで設定していきましょう。 deployする先の指定は、serverless-google-cloudfunctionsのv2.0.0 から出来るようになっています。 けれども、sls コマンドでinstallされるversionはv1.2.0なので、pluginのバージョンを上げる必要があります。

https://github.com/serverless/serverless/blob/63b8dafbeb7bd463acf9fe9a4f5ec51c7e972928/lib/plugins/create/templates/google-nodejs/package.json#L12

"devDependencies": {
  "serverless-google-cloudfunctions": "^2.0.0",
  "serverless-plugin-typescript": "^1.1.5"
}

その後、serverless.ymlの値を書き換えて実行してみます。

service: cloudfunction-sls-sample
provider:
  name: google
  region: asia-northeast1
  runtime: nodejs8
  project: ${env:PROJECT}

実行結果がこちらになります。

$ sls deploy
service: cloudfunction-sls-sample
project: xxx
stage: dev
region: us-central1

Deployed functions
first
  https://us-central1-xxx.cloudfunctions.net/http

ぱっと見るとus-central1にdeployされていてギョっとしますがcliを使って実際にdeployされているregionを確認してみると、ちゃんとasia-northeast1になっていることが確認できます。

gcloud beta functions describe http --region asia-northeast1
availableMemoryMb: 256
entryPoint: http
httpsTrigger:
  url: https://asia-northeast1-xxx.cloudfunctions.net/http <==ここをチェック
labels:
  goog-dm: sls-cloudfunction-sls-sample-dev
name: projects/xxx/locations/asia-northeast1/functions/http
runtime: nodejs8
serviceAccountEmail: xxx@appspot.gserviceaccount.com
sourceArchiveUrl: gs://sls-cloudfunction-sls-sample-dev-xxx/serverless/cloudfunction-sls-sample/dev/xxx-2018-09-25T10:08:07.390Z/cloudfunction-sls-sample.zip
status: ACTIVE
timeout: 60s
updateTime: '2018

AWS Lambdaと比較した所感

  • localでの動作確認について、lambdaはpluginで提供されているが、cloud functionsはまだない。
  • LambdaではTypeScriptテンプレートがあるので、特に何の指定もしなくて良い
  • Lambdaは起動するためのeventsが豊富
    • cloud functionsはhttpとpub subだけ
    • これがcloud functionsのデメリットとなるかは、pub subを触ってみないとなんとも言えない

コミットチャンス

宿題

  • credentialsや環境変数をcode buildなどから扱えるようにしたい
  • cloud functionに渡す権限を、もっとちゃんと整理したい

Azure ADのGraphAPIを利用する

この資料を読んでできるようになること

手順

  • Appを登録する
  • AccessTokenを取得する
  • GraphAPIを叩く

Appを登録する

  • Azure Active Directoryを選択
  • App Registrationsを選択
  • nameとsign-on URLを設定
    • このとき sign-on URLは適当なものでも良い
  • createボタンを押す
  • APIが作成されて画面が変化する
  • API AccessカテゴリのRequired Permissionsを選択
  • Microsoft Graphの中から必要なものを選択
  • Grant permissionsを実行する
  • ふたたび API Access カテゴリの中からKeysを選択
  • 適当にpasswordのdescriptionsを記入し保存すると、secret_keyが表示されるのでメモっておく
  • Application IDもメモっておく

AccessTokenを取得する

https://developer.microsoft.com/ja-jp/graph/docs/concepts/auth_v2_service#4-get-an-access-token

Graph APIを実行する際に必要なAccess Tokenの取得方法について、上記のドキュメントに記載されています。それによると、Access Tokenを取得するために必要なパラメータはclient_id、scope、client_secret, grant_typeの4つです。

// Line breaks are for legibility only.

POST /{tenant_id}/oauth2/v2.0/token HTTP/1.1
Host: login.microsoftonline.com
Content-Type: application/x-www-form-urlencoded

client_id=535fb089-9ff3-47b6-9bfb-4f1264799865
&scope=https%3A%2F%2Fgraph.microsoft.com%2F.default
&client_secret=qWgdYAmab0YSkuL1qKv5bPX
&grant_type=client_credentials

上記リクエストで必要なパラメータは、それぞれ下記のように設定します。

実際にAccessTokenを取得するためのコードは下記のようになります。

import * as request from "request";

const OauthTokenEndpoint = process.env.OAUTH_TOKEN_ENDPOINT;
const AppID = process.env.APP_ID;
const AppKEY = process.env.APP_KEY;

export function getAccessToken(): Promise<string> {
  const requestParams = {
    grant_type: "client_credentials",
    client_id: AppID,
    client_secret: AppKEY,
    scope: "https://graph.microsoft.com/.default"
  };

  return new Promise((resolve, reject) => {
    request.post({ url: OauthTokenEndpoint, form: requestParams }, function(err, _response, body) {
      var parsedBody = JSON.parse(body);
      if (err) reject(err);
      if (parsedBody.error_description) reject(parsedBody.error_description);
      resolve(parsedBody.access_token);
    });
  });
}

このとき、OAUTH_TOKEN_ENDPOINTはhttps://login.microsoftonline.com/${tenant_id}/oauth2/v2.0/tokenのような値になります。

GraphAPIを叩く

Azure ADにおいてディレクトリ内のデータに対して操作をするには Graph APIを利用する必要があります。今回はAzure AD上にGroupを作ってみることにしました。 https://developer.microsoft.com/en-us/graph/docs/api-reference/v1.0/api/group_post_groups

このAPIを実行するために、microsoftがpackageを提供しているので利用してみても良いでしょう。 https://github.com/microsoftgraph/msgraph-typescript-typings

実装

import * as auth from "./auth";
import { AzureClient } from "./AzureClient";

async function handler(): Promise<void> {
  const token: string = await auth.getAccessToken();
  const client: AzureClient = new AzureClient(token);
  const res = await client.createGroup();
  console.log(res);
}

handler();
import { Client } from "@microsoft/microsoft-graph-client";

export class AzureClient {
  client: Client;

  constructor(token: string) {
    this.client = Client.init({
      authProvider: done => {
        done(null, token);
      }
    });
  }
  public createGroup() {
    const requestParams = {
      displayName: "sample Display Name",
      mailEnabled: false,
      mailNickname: "SAMPLE",
      securityEnabled: true
    };
    return this.client.api("/groups").post(requestParams);
  }
}

レスポンス

{ 
  '@odata.context': 'https://graph.microsoft.com/v1.0/$metadata#groups/$entity',
  id: 'xxxx',
  deletedDateTime: null,
  classification: null,
  createdDateTime: '2018-09-21T04:21:05Z',
  creationOptions: [],
  description: null,
  displayName: 'sample Display Name',
  groupTypes: [],
  mail: null,
  mailEnabled: false,
  mailNickname: 'idaas',
  onPremisesLastSyncDateTime: null,
  onPremisesSecurityIdentifier: null,
  onPremisesSyncEnabled: null,
  preferredDataLocation: null,
  proxyAddresses: [],
  renewedDateTime: '2018-09-21T04:21:05Z',
  resourceBehaviorOptions: [],
  resourceProvisioningOptions: [],
  securityEnabled: true,
  visibility: null,
  onPremisesProvisioningErrors: [] 
}

ということで無事groupを作成することができました。

OpenID Foundationのガイドラインに沿ったRailsでのOIDC Implicit Flow実装

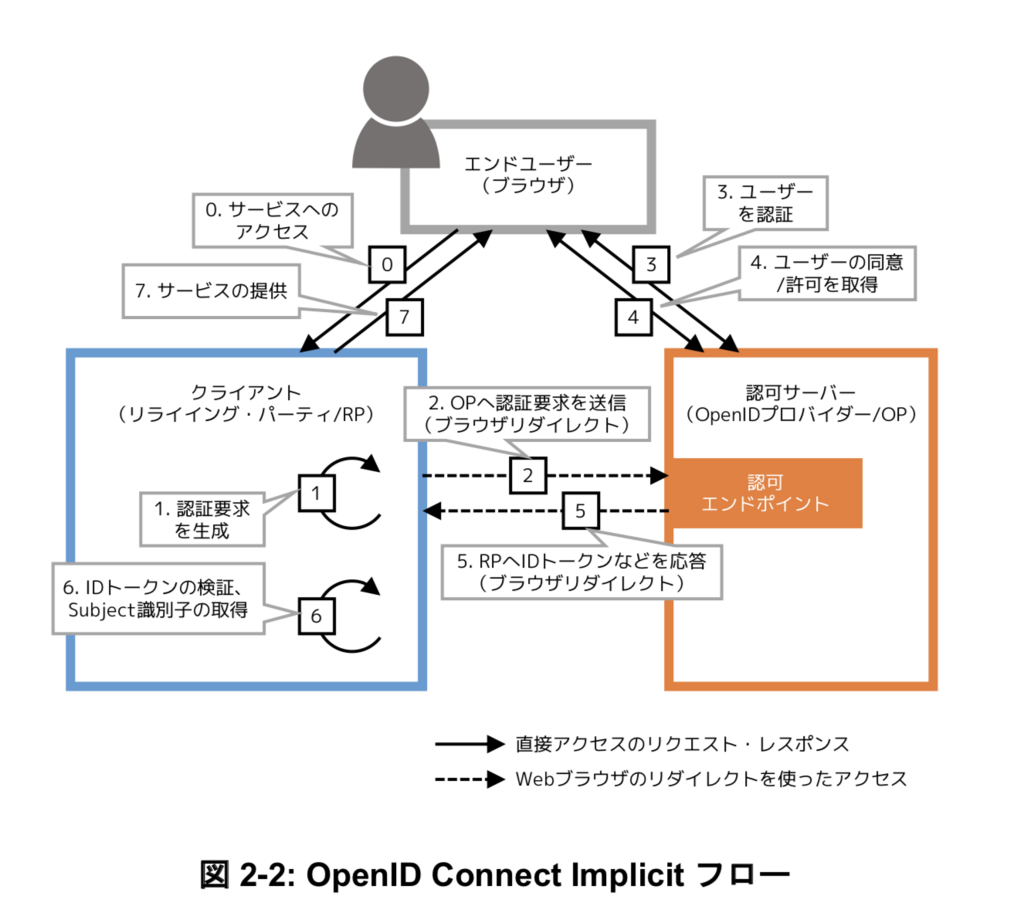
IDaaSを社内サービスに適用したかったので、その準備としてOpenID Foundation Japanのガイドラインが伝える OpenID Connect Implicit Flowの実装方法を試してみました。

前提

  • 本ドキュメントではOpenID Connectの仕様については説明しない
  • OpenID Foundation Japanが提供する実装ガイドに従って認証機能の実装を行う
  • 認証のフローはImplicit Flowを採用している
    • Authorization Code Flowは、OPとRPが直接やりとりをする必要がある
      • RP側でOPからアクセスできる口を開けなければならない
    • 上記理由から、ガイドラインではImplicit Flowの実装方法のみ記載されている (p.40 3.4.2 認証フロー参照)
  • 今回の実装では、強制ログアウト機能は未実装
  • SCIMも未対応

目次

  • Implicit Flowの概要
  • 実際の作業とRails実装
  • 懸念点

Implicit Flowの概要

f:id:selmertsx:20180822104348p:plain

( ※ https://www.openid.or.jp/news/eiwg_implementation_guideline_1.0.pdf のp.13より引用 )

Implicit FlowではOPとRPが直接やりとりをせずに、ブラウザ経由でIDトークンの受け渡しを行う。そのためRPでIDトークが改ざんされていないことを検証する必要がある。IDトークンとはエンドユーザーのOPに対する認証結果であり、emailやprofileなどのユーザー情報、OpenID Providerの情報、リプレイ攻撃対策のための文字列などを含んでいる。

Railsの実装とAzure AD側の設定

参考にした資料

参考実装1は、Dynamic Client Registrationを用いた OPの設定をしているものの、gem作成者が下記のような意見をしている。

https://github.com/nov/openid_connect/wiki/Client-Discovery

Some OPs are supporting Discovery without supporting Dynamic Registration, but I don't think RPs "need" to discover OP config for such OPs. Almost all RPs won't need this feature currently.

参考実装2は、シンプルな実装なので読みやすいものの、最新のopenid_connect gemでは動かない。このコミット で動作しなくなったものと思われる。

OPにRPの情報を登録する (AzureADの設定)

f:id:selmertsx:20180822104434p:plain f:id:selmertsx:20180822104444p:plain

Azure ADに対してRP側の情報を登録する(登録方法)。登録するべき情報はリダイレクト先のURLと、ログアウト要求を受け付けるエンドポイントのURLの2点である( ガイドライン P.31 ) 。リダイレクト先のURLは完全一致で指定しなければならない(p.30)。ここで登録することによって、OPからRPにClientIDが割り振られる。

RPにOPの情報を登録する

上記手順により得られたClientIDをRP側に設定する。ガイドラインから公開鍵をJWK Set形式で、外部からアクセスできるURIに配置した場合は、下記4点のパラメータをRPに登録することとなる。( P.32~33 )

  • OPから割り当てられたClient ID
  • Issuerの識別子
  • 認証エンドポイントURI
  • JWKs URI

Azure ADにてこれらのパラメータを取得する方法については、このドキュメントを参照。コレをもとに実際に実装したRailsのコードは下記のようになる。

# app/models/authorization.rb
class Authorization
  include ActiveModel::Model

  AUTHORIZATION_ENDPOINT = Rails.application.credentials.oidc[:authorization_endpoint].freeze
  ISSUER = Rails.application.credentials.oidc[:issuer].freeze
  IDENTIFIER = Rails.application.credentials.oidc[:identifier].freeze
  JWKS_URI = Rails.application.credentials.oidc[:jwks_uri].freeze

  attr_reader :client

  def initialize
    @client = OpenIDConnect::Client.new(
      issuer: ISSUER,
      identifier: IDENTIFIER,
      authorization_endpoint: AUTHORIZATION_ENDPOINT
    )
  end

  private

  // JWKは鍵を適宜DLして利用する
  def jwk_json
    @jwks ||= JSON.parse(
      OpenIDConnect.http_client.get_content(JWKS_URI)
    ).with_indifferent_access

    JSON::JWK::Set.new @jwks[:keys]
  end
end

RPからブラウザリダイレクトをしてOPに認証要求をする

ガイドラインのP.49 4.1.3 利用企業の認証サーバーへの認証要求 に、OPへの認証要求の方法が記載されている。そこではqueryパラメータに値を設定し、OPにアクセスをすることで認証の要求をすることになっている。

// OPに認証リクエストをする際のURL
https://login.microsoftonline.com/xxx/oauth2/v2.0/authorize?
  client_id=xxx
  &nonce=33cf756a5fc3c69c05f40ae6baa17dac
  &redirect_uri=http%3A%2F%2Flocalhost%3A3000%2Fcallback
  &response_type=id_token
  &scope=openid+email+profile
  &state=8fd4930f285a4e9e

今回はOPとしてAzure ADを利用しているため、各種パラメータの値はAzureADの公式ドキュメントを参照する。このサンプルではユーザーの基本情報しか取得しないため、response_typeはid_tokenとした。

# app/controllers/authorizations_controller.rb 一部抜粋
class AuthorizationsController < ApplicationController

  def new
    redirect_to authz.authorization_uri(new_state, new_nonce)
  end

  private

  def authz
    @authz ||= Authorization.new
  end

  def new_state
    session[:state] = SecureRandom.hex(8)
  end

  def new_nonce
    session[:nonce] = SecureRandom.hex(16)
  end
end
# app/models/authorization.rb 一部抜粋
class Authorization
  include ActiveModel::Model
  ...
  def authorization_uri(state, nonce)
    client.authorization_uri(
      response_type: 'id_token',
      state: state,
      nonce: nonce,
      scope: %w[openid email profile]
    )
  end
end

OPから認証結果を受け取る

OPに対して認証要求をした結果、redirect_uri で設定したURIに対して、認証結果がフラグメントとして付与される(ガイドライン p.50)。

// 受け取るレスポンス
http://localhost:3000/authorization
#token_type=Bearer
&expires_in=3599
&scope=profile+openid+email+xxxx%2fUser.Read
&id_token=eyJhbGciOiJSUzI1NiIsImtpZCI6ImlBdzUifQ.eyJpc3MiOiJodHRwczovL29wLmNvbS5
leGFtcGxlLmNvLmpwIiwic3ViIjoiZTEyMzQ1NjciLCJhdWQiOiJwV0JvUmFtOXNHIiwib
m9uY2UiOiJxOGstdXBCWDRaX0EiLCJleHAiOjE0Mfafsafadfdafavfabfdaa
xNDM1NzA5NzYyfQ.paxubCBAPwITlNgg-Mi_RkX5EfaRVU8YGT
Z2e9UwUX1EIwBDU3i_uCqUj-yUMY6Li1rjbpHurYEw7N3ZQPdBlVy6GiMQtUFg6Ju-0MY4
rw0uiZ7HFoGenAMzoR8fNd4iIuyM4oOEF6WuV5JLfZmJ5fvgjTbAD5H-2SGeM38P8UibRy
v2lB-YldI8a7nEUGXz5m5iw-WpBgk4SboMWXsyg-jr-_fbRMn9_RR76-691P45-1p8BU8w
BMEwgHVARTbRg53W6dlILAl_FDWWIBxUboI9_uTKu7HCYuZecU7Uub6MXG5EMWJKUPjVuu
HuvkzBsl7MdKCRZuwI1fEAU35lYQ
&state=d612642b27161676
&session_state=e9ed8a15-9337-4cb1-bb8b-823dfef7a15d

今回は GET authorization/callback をredirect先に指定したため、下記のような実装になる。なおJavaScriptのコードについてはOpenID Connect Core 15.5.3 のコードそのままとしている。

<%# app/views/authorizations/callback.html.erb %>
<h1>CallBack!!</h1>
<%= javascript_pack_tag "openid_connect" %>
// app/packs/openid_connect.js
// authorization/callbackで実行されるJavaScript
let params = {}
const postBody = location.hash.substring(1);
const regex = /([^&=]+)=([^&]*)/g;
let m;
while (m = regex.exec(postBody)) {
  params[decodeURIComponent(m[1])] = decodeURIComponent(m[2]);
}
var req = new XMLHttpRequest();
req.open('POST', '//' + window.location.host + '/authorization', true);
req.setRequestHeader('Content-Type', 'application/x-www-form-urlencoded');
var token = document.querySelector("meta[name='csrf-token']").attributes['content'].value;
req.setRequestHeader('X-CSRF-Token', token);
req.onreadystatechange = function (e) {
  if (req.readyState == 4) {
    if (req.status == 200) {
      console.log("success!!");
    }
    else if (req.status == 400) {
      alert('There was an error processing the token')
    } else {
      alert('Something other than 200 was returned')
    }
  }
};
req.send(postBody);

ID トークンの検証を行う

認証に成功した後に、IDトークンの検証を行う。IDトークンの検証においては、state値が認証要求時に指定した値と同一であるかチェックした後(p.52)、jwkを用いてIDトークンをdecodeして検証を行う。検証項目についてはガイドラインを参照とする(p.54)。

# app/controllers/authorizations_controller.rb 一部抜粋
class AuthorizationsController < ApplicationController
  def create
    if stored_state != fragment_params[:state]
      return render status: :unauthorized
    end

    id_token = authz.verify!(fragment_params[:id_token], stored_nonce)
    session[:identifier] = id_token.subject
    render json: id_token.raw_attributes, status: :ok
  end
end
# app/models/authorization.rb 一部抜粋
class Authorization
  include ActiveModel::Model

  def verify!(jwt_string, nonce)
    id_token = decode_jwt_string(jwt_string)
    id_token.verify!(
      issuer: ISSUER,
      client_id: IDENTIFIER,
      nonce: nonce
    )
    id_token
  end

  private

  def decode_jwt_string(jwt_string)
    OpenIDConnect::ResponseObject::IdToken.decode(jwt_string, jwk_json)
  end

  def jwk_json
    @jwks ||= JSON.parse(
      OpenIDConnect.http_client.get_content(JWKS_URI)
    ).with_indifferent_access

    JSON::JWK::Set.new @jwks[:keys]
  end
end
// ID TokenをDecodeした結果
{
 "aud"=>"xxxx", // required: IDトークンを利用しようとするクライアント
 "iss"=>"https://login.microsoftonline.com/xxxx/v2.0", //required: ID Tokenの発行者(Issuer)を表す識別子
 "iat"=>1534834161,  // require: IDトークンが発行された時刻。UTC
 "nbf"=>1534834161,
 "exp"=>1534838061, // required: IDトークンの有効期限
 "aio"=> "xxx",
 "name"=>"selmertsx",
 "nonce"=>"fcecee85d465e7df8e6d225c8e00bf15", // option: リプレイ攻撃の対策に利用される文字列
 "oid"=>"xxx",
 "preferred_username"=>"shuhei.morioka@hogehoge.com",
 "sub"=>"xxx", //required: 認証されたユーザーを表す識別子. Issuer内で一意
 "tid"=>"xxx",
 "uti"=>"xxx",
 "ver"=>"2.0"
}

懸念点

  • openid_connectのgemではlogout_termの検証をしていない

openid_connectのgemではlogout_termの検証をしていない

ガイドラインにおいて、IDトークンの検証として、最低限下記の項目について検証することとしている。(p.54)

  1. iss クレームが、認証要求を送った利用企業の認証サーバーの URL と一致することを検証する。
  2. aud クレームが、自クラウドサービスに割り当てられた client_id であることを検証する。 もし aud クレームが複数の値を持つ場合は、OpenID Connect Core 1.0 [OpenID.Core] の Section 3.1.3.7 の定義に従った追加の検証が必要である。
  3. ID トークンの署名を、RS256 アルゴリズムを用いて検証する。 ID トークンの base64url エンコーディングされた 1 番目、2 番目のパートを '.' で連結し た文字列を、ハッシュ関数に SHA-256 を使うように構成された RSASSA-PKCS1-v1_5 署名検証器にかけることで検証を行なう。 具体的な手順は JWS [RFC7515] の Section 5.2, Section A.2 などに示されている。署名 検証に用いる公開鍵の取得方法は [4.1.9 節] に示す。 もし、ID トークンに RS256 以外の署名アルゴリズムが指定されており、その署名をク ラウドサービスが検証可能な場合は、その検証で代替しても良い。
  4. 現在時刻が exp クレームで指定された時刻よりも前であることを検証する。
  5. nonce クレームが、クライアント(ブラウザ)セッションと紐付いた nonce 値と一致す ることを検証する。
  6. logout_only クレームが含まれていないことを検証する。

ここで3と6の項目について、現在のopenid_connectのライブラリでは検証がされていないように見受けられた。現在、これが検証されていない場合、どのようなリスクがあるのか調査中。

# openid_connect/lib/openid_connect/response_object/id_token.rb
# https://github.com/nov/openid_connect/blob/007d35f249b028a43391550153c22e9cf006e661/lib/openid_connect/response_object/id_token.rb#L24-L35

      def verify!(expected = {})
        raise ExpiredToken.new('Invalid ID token: Expired token') unless exp.to_i > Time.now.to_i
        raise InvalidIssuer.new('Invalid ID token: Issuer does not match') unless iss == expected[:issuer]
        raise InvalidNonce.new('Invalid ID Token: Nonce does not match') unless nonce == expected[:nonce]

        # aud(ience) can be a string or an array of strings
        unless Array(aud).include?(expected[:audience] || expected[:client_id])
          raise InvalidAudience.new('Invalid ID token: Audience does not match')
        end

        true
      end

その他

ユーザー情報の受け取り方

ユーザー属性情報の受け取り方について、scopeを用いるものとUserInfoエンドポイントを提供するものがある。Azure ADにおいては、今回の実装ではUserInfoエンドポイントを使わずに、scopeに値を追加する形にした。

https://docs.microsoft.com/en-us/azure/active-directory/develop/v2-oauth2-implicit-grant-flow#send-the-sign-in-request

RailsでOpenID Connect Implicit Flowを試す

モチベーション

  • RailsでIDaaSを使った認可認証を一通り自分で作りたい
  • それによってOIDC Implicit Flowの実現において、必要な処理に関する理解を深めたい
  • OIDC Implicit Flowを使ったのは、既存のSPAサービスに組み込むのであれば、これが一番楽そうだったので
    • 他にもSAML認証などがある。おいおい試していきたい

自分で用意したサンプル実装はこちら

GitHub - selmertsx/pomodoro

今回参考にした資料

前準備

https://docs.microsoft.com/ja-jp/azure/active-directory/develop/v1-protocols-oauth-code#register-your-application-with-your-ad-tenant

上記URLの「AD テナントへのアプリケーションの登録」をそのままなぞれば大丈夫。1点だけ気をつけるべきポイントは、Reply URLsにはフルパスを指定する必要があること。

f:id:selmertsx:20180813172651p:plain

今回の処理の概要

今回は実装にあたって、openid-foundation-japanの提供するサンプルを参考にした。サンプル実装を取り入れるにあたって、あまりフローの整理などはしていない。もう少し整理ができるはずなので、ちょいちょいコードを整えていきたい。

  1. Client(JS Frontend)からServerに、IdP(Azure AD)への認証URLを問い合せる
  2. Rails Serverで、Clientを認証用 URLにリダイレクトさせる
  3. IdPでユーザーの認証を行う
  4. IdPでユーザーの認証ができたら、Rails Serverの任意のURLにリダイレクトをさせる
  5. Rails Serverで、IdPから受け取ったID Tokenをdecodeする
  6. 問題なければLogin後画面に遷移させる

実装説明

IdPの認証URL問い合わせ

# app/controllers/authorizations_controller.rb
class AuthorizationsController < ApplicationController

  def new
    redirect_to authz.authorization_uri(new_state, new_nonce)
  end

  private

  def authz
    @authz ||= Authorization.new
  end

  def new_state
    session[:state] = SecureRandom.hex(8)
  end

  def new_nonce
    session[:nonce] = SecureRandom.hex(16)
  end
end
# app/models/authorization.rb 一部抜粋
class Authorization
  include ActiveModel::Model

  def initialize
    @issuer = Rails.application.credentials.oidc[:issuer]
    @identifier = Rails.application.credentials.oidc[:identifier]
    @redirect_uri = Rails.application.credentials.oidc[:redirect_uri]
  end

  def authorization_uri(state, nonce)
    client.redirect_uri ||= redirect_uri
    response_type = %i[id_token token]
    client.authorization_uri(
      response_type: response_type.collect(&:to_s),
      state: state,
      nonce: nonce,
      scope: %i[openid email profile].collect(&:to_s)
    )
  end
  
  private

  def client
    @client ||= OpenIDConnect::Client.new(
      issuer: issuer,
      identifier: identifier,
      authorization_endpoint: config.authorization_endpoint
    )
  end

  def config
    @config ||= OpenIDConnect::Discovery::Provider::Config.discover! issuer
  end
end

authorization_uri methodで生成される文字列は下記のようになる。

https://login.microsoftonline.com/xxx/oauth2/v2.0/authorize?
client_id=xxx&
nonce=33cf756a5fc3c69c05f40ae6baa17dac&
redirect_uri=http%3A%2F%2Flocalhost%3A3000%2Fcallback&
response_type=id_token+token&
scope=openid+email+profile&
state=8fd4930f285a4e9e

ID TokenのDecode

authorizations/callback

受け取るレスポンス

http://localhost:3000/authorization
#access_token=xxx
&token_type=Bearer
&expires_in=3599
&scope=profile+openid+email+00000003-0000-0000-c000-000000000000%2fUser.Read
&id_token=xxxx
&state=d612642b27161676
&session_state=e9ed8a15-9337-4cb1-bb8b-823dfef7a15d
# app/models/authorizations_controller.rb 一部抜粋
class AuthorizationsController < ApplicationController
  def callback
  end
end
# app/views/authorizations/callback.html.erb
<h1>CallBack!!</h1>
<%= javascript_pack_tag "openid_connect" %>
// app/packs/openid_connect.js 一部抜粋
let params = {}
const postBody = location.hash.substring(1);
const regex = /([^&=]+)=([^&]*)/g;
let m;
while (m = regex.exec(postBody)) {
  params[decodeURIComponent(m[1])] = decodeURIComponent(m[2]);
}
var req = new XMLHttpRequest();
req.open('POST', '//' + window.location.host + '/authorization', true);
req.setRequestHeader('Content-Type', 'application/x-www-form-urlencoded');
var token = document.querySelector("meta[name='csrf-token']").attributes['content'].value;
req.setRequestHeader('X-CSRF-Token', token);
req.onreadystatechange = function (e) {
  if (req.readyState == 4) {
    if (req.status == 200) {
      console.log("success!!");
    }
    else if (req.status == 400) {
      alert('There was an error processing the token')
    } else {
      alert('Something other than 200 was returned')
    }
  }
};
req.send(postBody);

authorization/create

# app/controllers/authorizations_controller.rb 一部抜粋
class AuthorizationsController < ApplicationController
  def create
    # TODO: strong parameter使う
    id_token = authz.decode_id_token(params) 
    id_token.verify!(issuer: authz.issuer, client_id: authz.identifier, nonce: stored_nonce)
    session[:identifier] = id_token.subject
    render json: id_token.raw_attributes, status: :success
  end
end

細かい説明については、OIOI載せていく